Free Pallet Patio Garden

Easy Step by Step Guide

Fancy growing your own fruit and veg? I thought the same and am now managing just that! Here’s how to build your own free pallet patio garden.

Last year I had a new patio and it’s a great area to sit out in as it captures a lot of sun.  The boys use our garden to play football and I learnt the hard way that football and plant borders don’t mix well! I actually get upset when I see the ball thud into the plants and race over to see whats happened. The boys then scurry away waiting to see if yet another tomato plant has bitten the dust.

So when the patio was laid I started thinking of ways that I could enjoy growing some fruit and vegetables on the patio.

I wanted a way to use recycled products and make something that really made the most of the small compact space we had.

Here’s a step by step guide to how I made this brilliant pallet patio garden out of mainly recycled bits and bobs, for free!

Free Pallet Patio Garden
Our blank canvas!

Free Pallet Patio Garden

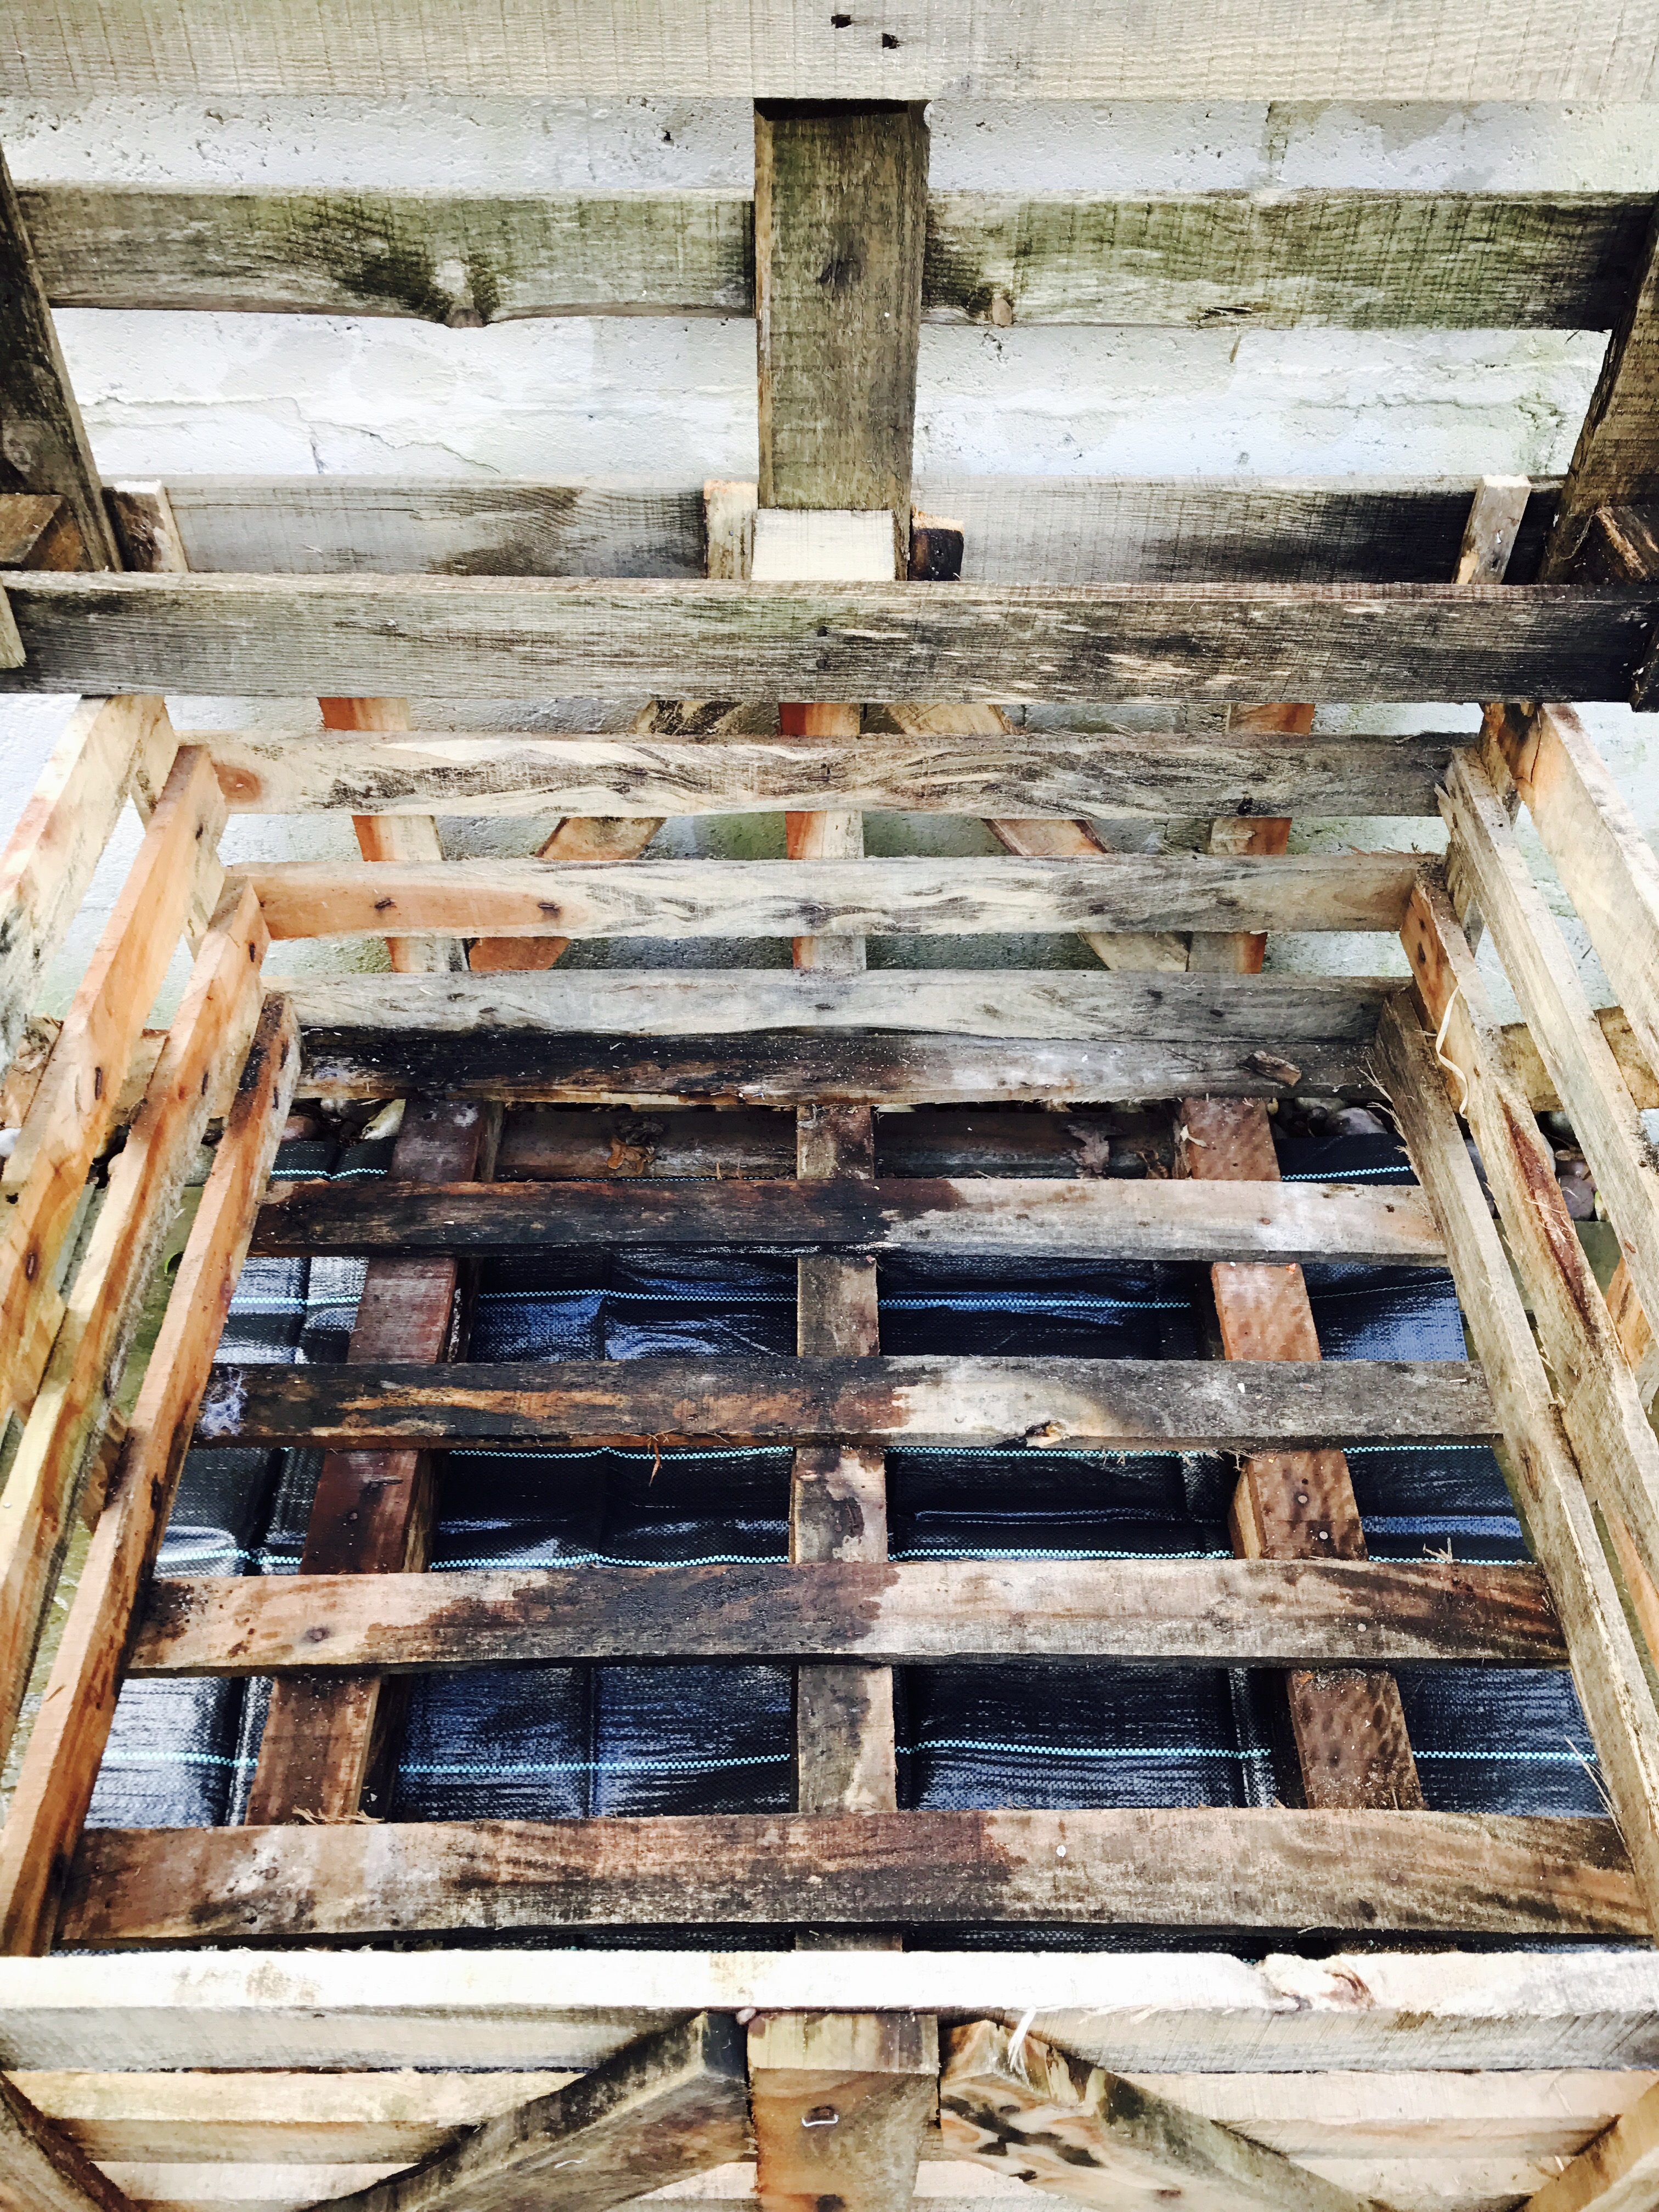
We put a base down so that the structure wouldnt sit directly on the slabs and cause too much discolouration.

Free Pallet Patio Garden

Here is my other half fixing a free pallet that we picked up onto the back of the crate used to deliver the patio slabs in. If you can get hold of more pallets then use them to make a crate. You can find them on free sites or even in skips.

Free Pallet Patio Garden

We had some weed suppressor mat in the shed and if you havent got anything like that hanging around then they are easy to pick up very cheaply. I just wanted something lining the inside that would help with keeping the pots contained and not having the water running straight out onto the ground.


Free Pallet Patio Garden
The you are all ready to go and start putting in the pots that you wish to have there. What I found useful was that on the sunny days I can move the pots onto the top of the back pallet and they can make use of the sunshine. When it’s a windy day they can nestle back into the base and be a bit more protected.

free pallet patio garden

You can see by these photos how the plants are coming along. The potatoes are growing well and the carrots on the right hand side in the base are showing nicely. I’ve planted onions next to them as apparently they fend off one of the mites that would eat the carrot tops.

free pallet patio garden

Come back soon for an update and more than likely a recipe made out of some of the home grown veg. It will be great to see you again.

Have you got any tips on growing veg in small spaces? You might be a seasoned pro or just starting out. I’d love to hear.

share with others this handy guide... click to shareClick To Tweet

Subscribe to Blog via Email

Enter your email address to subscribe to this blog and receive notifications of new posts by email.

First written by me in the summer of 2017 and as I’ve started putting my new seedlings in it again this year I just had to share it with you again.

This weeks pamper products – Natralus

This week has seen me taking a look at some lovely new products from Natralus. The sun has shone for a few days so as soon as I see this glimmer I always get into the flip flops and don’t take them off until September! Living so near to the sea is such a blessing, it means that when I’ve finished work and picked the kids up it’s easy to just drive and within 10 minutes we are on the beach and I’m watching them play football while I feel the sand between my toes.

Whether it’s because of all the time I spend in flip flops and walking around in the sea air, or *coughs* getting a bit older, I feel I need to keep my face, feet and hands moisturised. So I jumped at the chance to have a look these little gems.

Natralus is an  Australian owned  family business, located in South Australia. Using natural and organic ingredients  to create their products it’s a great way to have peace of mind that they have you covered in the area of keeping it as natural as possible.


This weeks pamper products - Natralus

Back when I was at school I have always used some form of lip soothe or butter on my lips. As an adult I don’t tend to wear lipstick but rely instead on lip nourisher, even the really good quality lipsticks don’t seem quite right and dry my lips out, I’m yet to find one that doesn’t. The Paw Paw lip butter is one of those that you have to resist the temptation to taste as it smells so good! It has 51mg per gram of organic Australian Paw paw in each tube and is enriched with Shea Butter and Vitamin E. You then get to choose from 4 flavours; Strawberry, Cocoa Butter, Coconut or Honey and Vanilla.


This weeks pamper products - Natralus

The intensive skin therapy is one of those creams that is nice and creamy yet it rubs into the skin without leaving a greasy overtone.

I ordered my products through Avernaco

This weeks pamper products - Natralus

What are your favourite pamper products at the moment? Maybe you would also like to pamper yourself by making some chocolate brownies?

Click to share these pamper products xClick To Tweet

Subscribe to Blog via Email

Enter your email address to subscribe to this blog and receive notifications of new posts by email.

Time for tea with Adagio – Review and Giveaway

I love a cuppa, last thing at night and first thing in the morning you will find me with a cup of tea somewhere close by. Over the years I have tried many different brands and had phases of drinking different types of tea. As part of my own growth in how I enjoy different foods and wine, they too have matured. There’s much more importance to me in how something tastes, what benefits it might have for me and where it has come from. No longer just a drink to have for the sake of it.

Adagio teas have a great take on how to order your tea to be delivered to your home. Their site is divided into sections which help you to make your choice simple. There are sampler packs which you can order that give you a range across the type of tea you wish to try. Loose tea is spooned into the paper filters made of taste-neutral wood and hemp fibres. You make your own little… or big tea bag, how cool is that! I liked this as even though you get the suggested amount to put in you can  adjust to your own taste.

Time for tea with Adagio - Review and Giveaway

Apparently tea is the most widely consumed drink second only to water. I can’t think of anything that is so versatile and has so many different flavours.

Time for tea with Adagio - Review and Giveaway

You can learn so much for the website such as how to make the perfect cuppa! That’s got to be high on my list of things to do. Like most things having a really good idea of how where why and how makes us all that little bit wiser.

Tea processing is five basic steps; some teas don’t utilize all of these steps, while other teas repeat them several times. Basic processing is Plucking, Withering (allowing the leaves to wilt and soften), Rolling (to shape the leaves and wring out the juices), Oxidising and Firing (ie: Drying).

I have been looking for warm drinks which my eldest son can have which don’t contain caffeine. There is lots of information on their blog which looks and explains caffeine in tea. My eldests health condition means that he has to have a chocolate, caffeine and yoghurt free diet as much as possible. A tough thing for someone reaching their teenage years. He wants to try so many new things and having a healthy warm drink after sports or a long walk are something he enjoys.

Time for tea with Adagio - Review and Giveaway

All real tea comes from the same plant, Camellia sinensis, which contains caffeine. Herbal infusions, such as Chamomile, Rooibos and Peppermint, are made from botanicals not related to Camellia sinensis, and they are naturally caffeine free. Adagio has a decaf range and a herbal range so there is a massive choice for us as a family and I can have one place to order from which is a plus point for me.

Time for tea with Adagio - Review and Giveaway

In addition to the teas you can also buy accessories such as cups, teapots, storage tins and filters.

Time for tea with Adagio - Review and Giveaway

The Giveaway

I have a great prize today which will be despatched by the fine people at Adagio Teas. It consists of 3 Sampler Packs of your choice and 1 Pack of Tea Filters so that you can start your new tea journey straight away!

a Rafflecopter giveaway

Subscribe to Blog via Email

Enter your email address to subscribe to this blog and receive notifications of new posts by email.

Disclaimer: I was given a selection of teas and teaware to review for the purpose of the post. All thoughts and opinions are my own. See my Contact Us page for full t&c’s for giveaways.

Creative Ideas and Safety for Kids’ Room Makeover

Creative ideas and safety for kids’ room makeover

Decorating a child’s playroom can be demanding. You obviously want a design that will look new for long and something that you want to see in your child’s room every day. If you have enough space, it is important to give your kids their space where they can keep toys as well as a safe place to play. Many kids love to have a space of their own next to their sleeping rooms. There are several ways to renovate a kid’s room

Consider safety first.

During kid room makeovers, consider their safety first. It does not matter the age of your baby, give the safety of your child a priority. Check these tips to ensure the child is safe:

  • Little kids are at risk of carbon monoxide. Ensure to install a detector for carbon monoxide.
  • Use low VOC paints as well as other healthy construction materials when doing a remodel.
  • Enable parental controls for the teen room if you want to include internet and television. This is so that you are aware and in control of what they watch.
  • The furniture for kids’ room needs to be off over the knee. Ensure that dressers and cabinets are secured to the wall.

Creative ideas and safety for kids’ room makeover

Choose bright colors

Children respond or react to bright colors and outsized outlines. Several contemporary color palettes can work well in kids’ room work and still work for adults that they don’t feel as if they spending time in the children room.

Update storage area

Kids love playing around. To ensure their room is neat all the time, ensure to update their play area for different activities. If they have toys and balls in the room ensure there is a place to store every one of them with labels. You might add open shelves that have baskets or bins if they were not there before to enable them to keep their things. As a result, this will be easy for them to access their belongings. It will also enable them to know where to put their playthings or items once they finish playing.

Creative ideas and safety for kids’ room makeover

Makeover the creative corner

If the kids’ room did not have a show corner, ensure to put up. It does not take that much space. Get them some costumes that will match the respective activities the get involved in. If the kids love drawing, ensure they have all the drawing tools. Add a curtain a chalkboard wall and make the room unique. Provide the kids with colorful chalks that they can use for their creativity on the chalkboard.

Add furniture

Include furniture with attractive colors or theme to their homework area. If your kids are tutored at home, ensure to find chairs that can be comfortable for them during their tuition.

During kids’ room makeover, it is crucial to keep the safety of your child in mind. Include things that were not there before but you think will be essential for the kids to have in the room. Nurture your child’s talent by providing her with all the tools he needs for his creative tasks.


Subscribe to Blog via Email

Enter your email address to subscribe to this blog and receive notifications of new posts by email.

collaborative post

Naipo Heated Seat Cover Review and Discount

Hello everyone! How have you been finding these cold days? We found it so exciting to get the snow in our neck of the woods when we haven’t had any for so long. It was only last week that my boys were saying to me “mummy when are we going to get snow we haven’t had it since 2012!” I can’t actually remember if it was 2012 but they were pretty adamant so I went with it.

With the schools being closed we found that we had a couple of snowy home days on our hands so we set out each morning and had a really good fun with it. As I haven’t actually believe that the snow would come I hadn’t bought sledges like I saw some of the children have so instead the boys went down the long sloping path leading down to the river on our old plastic food trays. They worked a treat until the constant battering got a little bit too much for them and then they broke into pieces! It was all good fun while it lasted. Suffice to say when we got back home we were all freezing cold and needed to warm up with lots of hot chocolate with marshmallows which added to the excitement.

In our household we have two cars, one – mine – *smiles* is the all singing all dancing heated seats, electric windows and almost drives itself to be honest. My other half’s car is probably the polar opposite, however, it is an amazing family car and we love it to bits.

I fancied treating my other half to something nice for his car and this is where the product that I’m going to show you today comes in so handy. This seat pad from Naipo is heated and cooling! Yes you heard right it heats or cools your seat and you can just pop it on either the passenger seat or the driver seat of your car really easily.

Naipo Heated Seat Cover Review and Discount

For those freezing cold mornings similar to what we just had imagine getting in your chilly car pressing the button and suddenly feel the warmth spread through your seat. Not only that but the seat looks really stylish as well when it’s in your car it gives it a sort of car makeover.

Naipo Heated Seat Cover Review and Discount
Universal fitting makes it super easy

For the really hot days in the summer and yes we are going to get some hot days even here in the UK, just have a little faith and cross your fingers of course, then the cooling fan function of the seat is perfect to offer much-needed relief particularly if you’re stuck in the car without any air-conditioning.

Naipo Heated Seat Cover Review and Discount

So I’ve talked about using the seat pad in the car which is probably where we would be using it, you can also use it on seats in the home. If you’ve got a cold home office or chilly kitchen seat then this could be the answer you have been looking for.

Naipo Heated Seat Cover Review and Discount
Hot or cold settings

I have a great money off code for you to use today, a whopping £10.00 off the price of this seat is available. Enter the Coupon code:7TWN2OUL at the checkout.

Click to share 🙂Click To Tweet

Subscribe to Blog via Email

Enter your email address to subscribe to this blog and receive notifications of new posts by email.

Happy Birthday Maya Angelou

Happy Birthday Maya Angelou

Poet, writer and civil rights activist are just some of the words used to describe this talented and brave woman. Maya Angelou would have been 90 years old today.

Have a little listen to this poem today. ‘Still I Rise’ is taken from her third volume of poetry of 32 poems published in 1978.

You may write me down in history
With your bitter, twisted lies,
You may trod me in the very dirt
But still, like dust, I’ll rise.

Does my sassiness upset you?
Why are you beset with gloom?
‘Cause I walk like I’ve got oil wells
Pumping in my living room.

Just like suns and like moons,
With the certainty of tides,
Just like hopes springing high,
Still I’ll rise.

Did you want to see me broken?
Bowed head and lowered eyes?
Shoulders falling down like teardrops.
Weakened by my soulful cries.

Does my sassiness upset you?
Don’t you take it so hard
‘Cause I laugh like I’ve got gold mines
Diggin’ in my own back yard.

You may shoot me with your words,
You may cut me with your lies,
You may kill me with your hatefulness,
But still, like life, I’ll rise.

Does my sexiness upset you?
Does it come as a surprise
That I dance like I’ve got diamonds
At the meeting of my thighs?

Out of the huts of history’s shame
I rise
Up from a past that’s rooted in pain
I rise
I’m a black ocean, leaping and wide,
Welling and swelling I bear in the tide.

Leaving behind nights of terror and fear
I rise
Into a daybreak miraculously clear
I rise
Bringing the gifts that my ancestors gave,
I am the hope and the dream of the slave.
And so, naturally.

There I go rising.

Subscribe to Blog via Email

Enter your email address to subscribe to this blog and receive notifications of new posts by email.

Easy Bake Chocolate Florentines

These Easy Bake Chocolate Florentines biscuits are so delicious that I actually made two batches before I managed to get the pictures of the finished article because I forgot on the first night  and by the next day they were nearly all gone!

If you have not had a Florentine before, then they are thin biscuits made with nuts and cherries and normally coated with chocolate on the flat underneath side. They are slightly crisp on the edges and then a fabulous chewy centre awaits!

I now coat half of the batch with chocolate and I leave half uncoated and I kid you not, they are both gorgeous.

The full recipe and directions are below and some handy photos here to reassure you of what it should look like at each stage.


Easy Bake Chocolate Florentines
The mixture as it should look just before baking.
Easy Bake Chocolate Florentines
You only need a teaspoon per biscuit!

Easy Bake Chocolate Florentines

It is best to temper the chocolate and I have written a quick reference post on how to do this the easy way if you are a home cook like me.

Easy Bake Chocolate Florentines
Coat as many as you like in the chocolate.
5 from 1 vote
Easy Bake Chocolate Florentines
Prep Time
5 mins
Cook Time
15 mins
Total Time
20 mins
 

These super elegant Florentines are a perfect easy bake which produce the most delicious crispy, chewy, mouth-watering biscuits.

Course: Sweet Treat
Servings: 24
Author: mainy - myrealfairy
Ingredients
  • 50 g Butter
  • 50 g Demerara sugar
  • 50 g Golden syrup
  • 50 g Plain flour
  • 50 g Flaked almonds
  • 25 g Glacé cherries
  • 200 g Dark chocolate
Instructions
  1. Preheat your oven to 180°C/350°F/Gas Mark 4. 

    Prepare your baking trays with parchment paper/grease proof paper for baking

  2. Add the butter, sugar and the golden syrup to a small saucepan and heat gently until the butter has melted. 

    When this has melted down, remove from the heat and add the flour, glacé cherries and flaked almonds.

    Easy Bake Chocolate Florentines
  3. Mix well with a large wooden spoon.

  4. Using a teaspoon, put one level teaspoon onto the baking tray and space 6 spoonfuls evenly over the baking tray. Space well as the mixture spreads during baking.

    Easy Bake Chocolate Florentines
  5. Bake for between 8 and 10 minutes, or until golden-brown. Let them cool on the baking trays before transferring to a cooling rack to cool down completely.

    Easy Bake Chocolate Florentines
  6. Melt the chocolate and temper using the method from my link. On the flat side of the florentine, spread a little melted chocolate until it is evenly covered. Wait 30 seconds and using a fork or the tip of the teaspoon, create a zig zag engraved effect in the chocolate.

Recipe Notes

Only use a teaspoon per biscuit as they spread more than you think!

Tweet to share this Easy Bake Chocolate Florentines RecipeClick To Tweet

Subscribe to Blog via Email

Enter your email address to subscribe to this blog and receive notifications of new posts by email.

How to Temper Chocolate the Easy Way

When I made my first recipe which needed me to temper the chocolate I was quite intimidated by the process and didn’t go too much further. Suffice to say that I had alot of split, grainy chocolate melting disasters!

So after doing some further research and trialing easy tempering methods I want to share the method that I use all the time now, with you.

Tempered chocolate has a glossy appearance to it and will have that snap to it that sounds just right. there is a science behind tempering chocolate which involves heating to the right temperature so that when the chocolate is heated and the fat molecules go out of alignment they need to be realigned correctly or the chocolate will ‘bloom’. This is when the chocolate looks grey and grainy and not as appealing as the glossy look we should go for. I’m sure there has been a time when you have left a chocolate bar in the car and it’s got warm and melted. The texture it then goes when it firms up is never quite the same is it? That’s because it has gone out of temper.

I use the method of heating in a heatproof dish over a pan of simmering water. I tried the microwave methods but I didn’t get on with it and prefer having more control by using the pan method.

Make sure the bowl can sit in the pan without touching the water. Also, the bowl must be kept very dry and not let any water inside.

Tempering Method

From a large bar of dark chocolate with a cocoa content of between 50-70%, break off three quarters of the bar and chop into small chunks.

Place these in the bowl and over the pan of simmering water.

Over the next 1-2 minutes these will melt.

When they have melted, take the bowl off the heat and stir quickly.

Put in the remaining chocolate.

Stir in continuously until it is all melted.

That’s it, you are now ready to dip or spread your chocolate onto your tasty treats.

how to temper chocolate the easy way

If you love chocolate recipes as much as I think you probably do then have a look at my Ultimate Chocolate Brownie Recipe and my Chocolate Vegan Cake. 

Enjoy and let me know what you think! I’d love to hear your ideas too.

Click to share this easy guideClick To Tweet

Subscribe to Blog via Email

Enter your email address to subscribe to this blog and receive notifications of new posts by email.

Fairy Pools

[metaslider id=326]


Once again I have been overtaken by the sights and images I’ve been collecting. For the past few weeks I’ve been researching the fairy pools in Scotland at Glen Brittle, the Isle of Skye during my blogging time excursions.

The mysterious fairy pools have become one of the most talked about internet tales…

Amazing little havens with beautiful sparkly waters.  There are tales of folklore creatures, small prickly backed, two legged imps, who inhabit the banks.

Have you heard of the fairy pool magic?

Legend has it that if you visit during the spring months when there is a ‘blue moon’, or second full moon in the month, which is the  rarest of sights and believed to hold magical qualities. Then this feature will bring out the little magical creatures.

I haven’t found anyone who has put a name to them yet despite searching extensively. It got me to thinking that maybe we could name them here…. If you fancy a try, then pop your suggestion in the comments box. You may of already heard of the name and can enlighten me, or you can just join in the fun and offer your own suggestions. I’d love to hear how creative you can be…….


Click to share the magical Fairy Pool feeling!Click To Tweet

fairy pool

Subscribe to Blog via Email

Enter your email address to subscribe to this blog and receive notifications of new posts by email.


4Play Pleasure Box Review & Giveaway

Are you ready for date night? Well I can help you to be super ready to enjoy some quality romantic time with that special someone. This post is for adults only so if you are reading with little ones around then to spare any blushes don’t read aloud!:)

When the 5o shades books came on the scene a few years ago I remember thinking that it was one of those times which changes the way that women view some of the more kinky and playful sides of a relationship. Talking about this with my girlfriends I knew that it was refreshing to discuss this side of what happened in the bedroom more openly.

The 4Play pleasure box is an intimate handpicked selection of fun sexual accessories to add that bit of fun into your relationship and enhance what you already have.

The brainchild of Sam and Ali, two mums and entrepreneurs who identified a gap in the market for a fun and empowering box of playful accessories that allow partners to reconnect with each other through foreplay.

Their first box is aimed at being sensual and romantic, even for those that have never dabbled into the exciting world of playtime before. After spending lots of time together shopping and exploring different products for the box, Sam and Ali decided to stick with items that every couple could enjoy today.

Lets see what the box contains:-

  • Black Satin Blindfold
  • Vibrating Cock Ring
  • Black Feather Tickler
  • Sex Gaming Dice
  • Edible Fruity Lubricant
  • Blow Job Mints
  • 2 x Condoms

The box comes with a cute little ‘How 2play’ booklet which explains each item in more detail.

What did I love about it; well, it came in a pretty but discrete package which is good, no worries there about blushing in front of the postman or woman. The booklet is really good because even though I knew about most of the items  I think this adds to the fun with your partner by reading it together and enjoying that intimacy too. I think it’s an ideal gift for a really close friend or for yourself.

The 4Play team said:

“In the world we live in, there are so many distractions that make us think the grass is greener elsewhere. The 4Play pleasure box is a tool that enables couples to focus on each other and water the grass together.”

How exciting then that you can visit their site to order and also enter here in the giveaway for your chance to win your very own box!

Giveaway!

a Rafflecopter giveaway

Open to over 18’s with a UK postal address.

You can check out the 4playteam on Instagram too.


Subscribe to Blog via Email

Enter your email address to subscribe to this blog and receive notifications of new posts by email.

Disclaimer: Lucky old me, I was sent one of these boxes to review. All opinions are my own.

Click to share with your followers 🙂Click To Tweet